Master Permanent Makeup Techniques for Flawless Application

You wake up with perfect eyebrows. Your eyeliner is flawless. Your lips have just the right amount of color. No mirror. No makeup bag. No morning rush to make yourself presentable.
Sound like a dream? It’s not. It’s permanent makeup, and it’s changing how thousands of people approach their daily beauty routine.
But here’s what most people don’t know: the technique your artist uses matters just as much as their artistic eye. The wrong technique can mean unnatural results, premature fading, or even scarring. The right technique creates beautiful, natural-looking results that last for years.
So what are the different permanent makeup application techniques, and how do you know which one is right for you? Let’s break down everything you need to know before you commit to anything permanent.
Understanding Permanent Makeup Basics
Before we dive into specific techniques, let’s cover what permanent makeup actually is and how it works.
What Is Permanent Makeup?
Permanent makeup, also called cosmetic tattooing or micropigmentation, is a form of tattooing that deposits pigment into the upper layers of your skin. The goal is to enhance your natural features and reduce your daily makeup routine.
Think of it as semi-permanent rather than truly permanent. While the pigment stays in your skin for years, it gradually fades over time. This is different from regular tattoos, which use different ink and go deeper into the skin.
The most popular permanent makeup procedures include:
- Eyebrows (microblading, powder brows, combo brows)
- Eyeliner (upper, lower, or both)
- Lip liner and full lip color
- Beauty marks
- Scalp micropigmentation for hair loss
Each procedure uses specific techniques designed for that particular feature. As a result, finding an artist who specializes in what you want is crucial.
[Image suggestion: Before and after comparison of permanent makeup eyebrows, showing natural-looking results]
How Permanent Makeup Differs from Regular Tattoos
Many people worry that permanent makeup will look like a regular tattoo. Here’s why it’s different:
Depth: Permanent makeup pigment goes into the upper dermis (about 1 to 2 millimeters deep). Regular tattoos go deeper, into the lower dermis (about 2 to 3 millimeters). This shallower depth means permanent makeup fades over time.
Pigment Type: Cosmetic pigments are specifically formulated for facial skin. They’re designed to fade naturally and are made from different ingredients than tattoo ink.
Technique: Permanent makeup artists use specialized tools and techniques designed for precision and natural results. Tattoo artists use different equipment suited for larger areas and bolder designs.
Purpose: The goal is enhancement, not decoration. Good permanent makeup should look like makeup, not like a tattoo.
Healing: Because permanent makeup is more superficial, it typically heals faster than regular tattoos, usually within 7 to 14 days.
In essence, permanent makeup is a specialized form of tattooing that requires specific training and artistry beyond traditional tattooing skills.
The Science Behind Different Application Methods
Different permanent makeup application techniques exist because different effects require different approaches. Let’s look at the science:
Manual vs. Machine Methods: Manual techniques use hand tools with tiny needles. Machine techniques use electric devices. Each creates different effects and has different healing processes.
Pigment Depth: How deep the pigment goes affects longevity, appearance, and healing. Deeper isn’t always better. In fact, too deep can cause pigment to spread or turn colors.
Stroke Patterns: Creating individual hair strokes requires different tools and techniques than creating solid color. The pattern affects how natural the result looks.
Skin Type Considerations: Oily skin, dry skin, mature skin, and sensitive skin all respond differently to various techniques. Good artists match technique to skin type.
Color Theory: Understanding how pigments heal and change over time is crucial. What looks perfect fresh might fade to the wrong color if applied incorrectly.
Moreover, new techniques continue to develop as technology and understanding improve. What was standard five years ago might be outdated today.
Eyebrow Permanent Makeup Techniques
Eyebrows are the most popular permanent makeup procedure. Several techniques create different looks, and understanding each one helps you choose what’s right for you.
Microblading
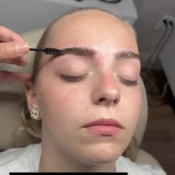
Microblading is probably the technique you’ve heard most about. It creates hair-like strokes that look incredibly natural.
How It Works: The artist uses a manual handheld tool with tiny needles arranged in a blade shape. They make small cuts in the skin and deposit pigment into these cuts, creating individual hair strokes.
Best For:
- People who want a natural, feathered look
- Those with normal to dry skin
- Anyone with gaps or sparse areas in their brows
- People who want a soft, subtle enhancement
Not Ideal For:
- Very oily skin (strokes blur and fade quickly)
- People prone to keloid scarring
- Those taking certain medications like blood thinners
- Anyone wanting very bold, defined brows
Longevity: Microblading typically lasts 1 to 2 years before needing a touch-up. Oily skin sees faster fading, sometimes within 6 to 12 months.
Healing Time: Initial healing takes about 7 to 10 days. Full healing and color settling take 4 to 6 weeks.
The key to beautiful microblading is an artist who understands hair growth patterns and can create strokes that mimic your natural brow hairs. Furthermore, they need to match the color perfectly and adjust for how the pigment will heal.
[Image suggestion: Close-up of microblading technique showing individual hair strokes being created]
Powder Brows (Ombre Brows)
Powder brows create a soft, filled-in look similar to wearing brow powder or pencil every day.
How It Works: Using a machine with a single needle or small needle grouping, the artist creates thousands of tiny dots of pigment. This technique is called pixelation or stippling. The dots create a powdered effect.
Best For:
- People with oily skin
- Those who want more definition and boldness
- Anyone who fills in their brows with makeup daily
- People who prefer a polished, makeup look
- Those with sensitive skin who can’t tolerate microblading
Not Ideal For:
- People who want an extremely natural, no-makeup look
- Those with very sparse brows who need individual hair simulation
Longevity: Powder brows last longer than microblading, typically 2 to 3 years, sometimes longer. The machine method deposits pigment more evenly and deeply.
Healing Time: About 7 to 10 days for initial healing, 4 to 6 weeks for complete healing and color settling.
Powder brows have become increasingly popular because they work on all skin types and last longer. Additionally, they’re often less painful than microblading because there’s no cutting of the skin.
Combo Brows (Microblading + Powder)
Combo brows combine microblading and powder techniques for the best of both worlds.
How It Works: The artist uses microblading to create hair strokes in the front and sparse areas of the brow, then uses the machine powder technique to add density and definition through the body and tail of the brow.
Best For:
- People who want natural-looking definition
- Those with combination skin types
- Anyone wanting hair strokes with added fullness
- People who want customizable results
Not Ideal For:
- Those on a tight budget (combo techniques often cost more)
- People who want only one specific look
Longevity: About 1.5 to 2.5 years, depending on skin type and aftercare. The powder portion lasts longer than the hair strokes.
Healing Time: Similar to other techniques, 7 to 10 days initial healing, 4 to 6 weeks complete healing.
Combo brows are ideal for most people because they provide texture and dimension. The front looks soft and natural with hair strokes, while the body and tail have definition and fullness.
Nano Brows
Nano brows are a newer technique that creates hair strokes using a machine instead of manual microblading.
How It Works: The artist uses a permanent makeup machine with a single ultra-fine needle. They create individual hair strokes just like microblading, but with more precision and less trauma to the skin.
Best For:
- People with oily or combination skin who want hair strokes
- Those who want longer-lasting hair stroke results
- Anyone with sensitive skin
- People seeking very fine, detailed strokes
Not Ideal For:
- Those who specifically want the manual microblading experience
Longevity: Typically 2 to 3 years, longer than traditional microblading because the machine deposits pigment more consistently.
Healing Time: Often faster than microblading, about 5 to 7 days initial healing because there’s less skin trauma.
Nano brows are gaining popularity because they combine the natural look of hair strokes with the longevity and skin-friendliness of machine work. Moreover, they work well on skin types that don’t hold microblading well.
Eyeliner Permanent Makeup Techniques
Permanent eyeliner eliminates the daily struggle of getting your liner even on both eyes. Different techniques create different looks.
Classic Eyeliner Technique
Classic permanent eyeliner creates a defined line along your lash line.
How It Works: The artist uses a permanent makeup machine to deposit pigment along the lash line. They can create thin, medium, or thick lines depending on your preference.
Placement Options:
- Lash Line Enhancement: Super subtle, just filling in between lashes
- Thin Line: Visible line that adds definition without being obvious
- Medium Line: More noticeable liner that defines the eye
- Winged Liner: Extends past the outer corner for a cat-eye effect
Best For:
- Anyone who wears eyeliner daily
- People with shaky hands or vision issues
- Those who want to enhance their lash line
- People with allergies to traditional eyeliner
Not Ideal For:
- Those who prefer different liner styles daily
- People with certain eye conditions (consult your doctor first)
Longevity: Eyeliner typically lasts 2 to 4 years, though it may fade to a softer color over time.
Healing Time: Eyes are sensitive, so swelling is common for 1 to 3 days. Complete healing takes about 7 to 10 days.
The most important factor in eyeliner is an artist with a steady hand and excellent precision. Even slight asymmetry is noticeable on the eyes.
[Image suggestion: Close-up of permanent eyeliner application process on upper lash line]
Smoky Eyeliner Technique
Smoky eyeliner creates a softer, more blended look rather than a harsh line.
How It Works: Instead of a defined line, the artist uses shading techniques to create a gradient effect. The color is darkest at the lash line and gradually fades upward.
Best For:
- People who want a sultry, dramatic look
- Those who prefer soft, smoky eye makeup
- Anyone wanting to make eyes appear larger
- People with hooded or mature eyelids
Not Ideal For:
- Those who prefer sharp, defined liner
- People who want a natural, no-makeup look
Longevity: Similar to classic liner, about 2 to 4 years.
Healing Time: 7 to 10 days, with possible swelling for the first few days.
Smoky liner requires an artist skilled in shading techniques and color transitions. The goal is a soft fade, not a messy blob.
Lower Lash Line Techniques
Some people choose to add permanent makeup to their lower lash line as well.
How It Works: Similar to upper liner but requires even more precision due to the delicate lower lid area. The artist typically creates a very thin line or just dots between the lower lashes.
Best For:
- People who wear lower liner daily
- Those wanting to balance upper liner
- Anyone seeking more eye definition
Not Ideal For:
- People with very sensitive lower lids
- Those with certain eye conditions
- Anyone prone to excessive swelling
Important Note: Lower liner requires extra care because the lower lid is thinner and more prone to migration or puffiness. Choose an experienced artist.
Lip Permanent Makeup Techniques
Permanent lip color and liner can save you from constant reapplication and give you a beautiful natural flush.
Lip Liner Technique
Lip liner defines the edges of your lips without adding color to the entire lip.
How It Works: The artist outlines your natural lip line or slightly beyond it to create fuller-looking lips. They can correct asymmetry and enhance your lip shape.
Best For:
- People with pale or undefined lip edges
- Those who want to prevent lipstick bleeding
- Anyone wanting to correct asymmetrical lips
- People who want subtle enhancement
Not Ideal For:
- Those wanting full lip color
- People with very sensitive lips
Longevity: About 2 to 4 years with proper care and sun protection.
Healing Time: Lips swell significantly for 2 to 4 days. Complete healing takes about 10 to 14 days.
Lip liner should look natural and follow your actual lip shape unless you’re specifically correcting or enhancing. Overdrawing too much looks obvious and unnatural.
Full Lip Color (Lip Blushing)
Lip blushing adds color to the entire lip, creating a natural tint that enhances your lip color.
How It Works: The artist deposits pigment throughout the entire lip, creating even color. They can go subtle for a natural flush or bolder for more dramatic color.
Best For:
- People with pale or uneven lip color
- Those who wear lip color daily
- Anyone wanting fuller-looking lips
- People with scarring or discoloration on lips
Not Ideal For:
- Those who like changing their lip color frequently
- People prone to cold sores (can trigger outbreaks)
- Anyone with very dark natural lip color wanting lighter lips
Longevity: Lips fade faster than other areas because they’re constantly moving and exposed. Expect 1 to 3 years.
Healing Time: Significant swelling for 2 to 4 days, flaking for 5 to 7 days, complete healing in 4 to 6 weeks.
[Image suggestion: Before and after lip blushing showing enhanced natural lip color]
Ombre Lip Technique
Ombre lips create a gradient effect with darker color on the outer edges and lighter color in the center.
How It Works: The artist uses shading techniques to create a graduated color transition. The outer lip line is darkest, gradually lightening toward the center of the lips.
Best For:
- People wanting a fuller lip appearance
- Those who like the ombre lip trend
- Anyone seeking dimension and definition
Not Ideal For:
- Those preferring solid, even color
- People wanting very natural-looking results
Longevity: About 1 to 3 years, similar to full lip color.
Healing Time: Same as full lip color, with significant swelling initially.
Ombre lips require advanced shading skills and color theory knowledge. The transition should be smooth and natural, not patchy or obvious.
Advanced and Specialized Techniques
Beyond the basics, several specialized techniques address specific needs and create unique effects.
Combination Techniques
Many modern artists combine multiple techniques in one procedure for optimal results.
Examples:
- Microblading with machine shading for depth
- Hair strokes with powder for definition
- Soft liner with shading for dimension
Benefits:
- More customization to your features
- Better results for difficult skin types
- Greater longevity in some cases
- More natural-looking outcomes
However, combination techniques require highly skilled artists who master multiple methods. They also often cost more than single-technique procedures.
Corrective Permanent Makeup
Sometimes people need to fix previous permanent makeup that didn’t turn out well.
Color Correction: Covering or neutralizing unwanted colors from old work. This might involve applying complementary colors to cancel out unwanted tones before applying new pigment.
Shape Correction: Fixing asymmetry, poor shaping, or placement from previous work. This is trickier because you’re working within constraints of existing pigment.
Removal and Redo: In severe cases, laser removal might be necessary before applying new permanent makeup. This adds time and cost but ensures the best final result.
Scar Camouflage: Covering scars within or near permanent makeup areas requires specialized techniques and pigment selection.
Corrective work is advanced and should only be done by experienced artists. Moreover, it often takes multiple sessions and costs more than initial procedures.
Areola Reconstruction
This specialized technique helps breast cancer survivors who’ve had mastectomies.
How It Works: The artist creates realistic-looking areolas using permanent makeup techniques. They use color matching and 3D shading to mimic natural areolas.
Importance: This procedure provides significant psychological benefits, helping survivors feel whole again.
Technique: Requires understanding of color theory, shading, and creating realistic texture and dimension.
Many permanent makeup artists offer this service at reduced rates or even free as a way to give back to the community.
Scalp Micropigmentation
This technique creates the appearance of hair follicles on the scalp for people with hair loss.
How It Works: Using specialized equipment and pigments, artists deposit tiny dots on the scalp that look like hair follicles. This creates the illusion of a fuller head of hair or a buzz-cut appearance.
Best For:
- Men and women with thinning hair
- People with alopecia
- Those who’ve had hair transplants and want to camouflage scars
- Anyone wanting the appearance of fuller hair
Technique Requirements: Specialized training beyond regular permanent makeup because scalp skin is different from facial skin.
Choosing the Right Technique for You
With so many permanent makeup application techniques available, how do you choose? Here’s how to make the best decision.
Skin Type Considerations
Your skin type dramatically affects which techniques work best for you.
Oily Skin:
- Best: Powder brows, nano brows, machine techniques
- Avoid: Traditional microblading (fades very quickly)
- Why: Oil causes hand-drawn strokes to blur and fade
Dry Skin:
- Best: Microblading, any technique works well
- Bonus: Usually retains pigment well
- Why: Lack of oil means pigment stays crisp
Combination Skin:
- Best: Combo brows, nano brows
- Options: Most techniques work with proper aftercare
- Why: Different areas might need different approaches
Mature Skin:
- Best: Powder brows, soft techniques without harsh lines
- Avoid: Sharp microblading strokes (can look unnatural)
- Why: Skin texture changes require softer application
Sensitive Skin:
- Best: Machine techniques (less trauma than manual)
- Caution: Increased aftercare needs
- Why: Machine work is often gentler on sensitive skin
Furthermore, your artist should examine your skin and recommend techniques accordingly. Don’t insist on a technique that won’t work for your skin type.
[Image suggestion: Comparison chart showing different skin types and recommended permanent makeup techniques]
Lifestyle and Maintenance Factors
Consider your daily life when choosing techniques.
Active Lifestyle:
- Choose longer-lasting techniques (powder, machine methods)
- Consider sweat-resistant areas (eyebrows over eyeliner)
- Plan for fading from sun exposure
Low Maintenance Preference:
- Opt for techniques requiring less frequent touch-ups
- Choose neutral colors that don’t need updating
- Consider fuller coverage like powder brows
Makeup Enthusiast:
- Select techniques that enhance but don’t overwhelm
- Leave room for creativity with regular makeup
- Consider just liner or brows, not full lip color
Professional Environment:
- Choose natural-looking techniques
- Avoid bold colors or dramatic shapes
- Opt for subtle enhancement
Budget Considerations:
- Factor in touch-up costs (microblading needs more frequent touch-ups)
- Consider longevity versus initial cost
- Some techniques cost more upfront but last longer
Desired Look and Aesthetic
What look do you want to achieve?
Natural No-Makeup Look:
- Microblading or nano brows
- Lash line enhancement
- Subtle lip liner or light lip blushing
Polished and Defined:
- Powder brows or combo brows
- Classic eyeliner
- Full lip color
Dramatic and Bold:
- Thicker powder brows
- Winged eyeliner
- Ombre lips or darker lip color
Corrective and Restorative:
- Techniques that correct asymmetry
- Color that evens tone
- Shape that balances features
Your desired aesthetic should guide technique selection. Bring reference photos to your consultation showing looks you love.
Finding a Qualified Artist
The technique only works if the artist applying it knows what they’re doing. Here’s how to find someone qualified.
Certifications and Training to Look For
Not all permanent makeup artists are equally trained. Look for:
Formal Training: Artists should have completed comprehensive permanent makeup training from reputable academies. This should include both theory and hands-on practice.
Bloodborne Pathogen Certification: Required in most states, this proves the artist knows proper sanitation and safety protocols.
Continuing Education: Good artists regularly attend workshops and training to learn new techniques and stay current.
Specialized Certifications: For specific techniques (microblading, powder brows, eyeliner), artists should have dedicated training in those methods.
Portfolio Review: Examine before and after photos of their actual work, not stock photos. Look for consistency and quality across multiple clients.
Additionally, check if they’re licensed or certified in your state. Requirements vary, but compliance with local regulations is essential.
Questions to Ask During Consultations
Before committing to an artist, ask:
- How long have you been doing permanent makeup?
- What techniques do you specialize in?
- How many of this specific procedure have you performed?
- Can I see a portfolio of your work?
- Do you have client references or reviews?
- What products and pigments do you use?
- What’s your sanitation and safety protocol?
- What happens if I’m not happy with the results?
- What’s your touch-up policy?
- What are the total costs including touch-ups?
Pay attention to how they answer. Confident, detailed answers indicate expertise. Vague or defensive responses are red flags.
Warning Signs to Avoid
Some red flags indicate you should find a different artist:
Practicing from Home: Unless it’s a properly licensed home studio, this raises sanitation concerns.
Unusually Low Prices: Quality permanent makeup isn’t cheap. Rock-bottom prices often mean inexperience or cutting corners.
No Portfolio: Every experienced artist should have extensive before and after photos.
Pressure to Book: Good artists let you take time to decide. Pressure tactics are unprofessional.
Poor Hygiene: If the space isn’t immaculately clean or the artist doesn’t follow sanitation protocols, leave immediately.
Unwilling to Answer Questions: Your artist should welcome questions and educate you about the process.
No Patch Test: Reputable artists perform patch tests for people with sensitive skin or pigment allergies.
Guarantees Specific Results: No honest artist can guarantee perfect results because healing varies by person.
Trust your instincts. If something feels wrong, find someone else. This is your face we’re talking about.
[Image suggestion: Clean, professional permanent makeup studio showing proper sanitation and equipment]
Aftercare and Healing for Different Techniques
Proper aftercare determines how well your permanent makeup heals and lasts. Different techniques require slightly different care.
General Aftercare Guidelines
Regardless of technique, follow these universal rules:
Days 1 to 3:
- Keep area clean and dry
- Gently blot away lymph fluid
- Apply recommended ointment sparingly
- Avoid makeup on the treated area
- No swimming, saunas, or excessive sweating
- Sleep on your back to avoid rubbing the area
Days 4 to 7:
- Continue gentle cleaning
- Area will start to flake or peel (don’t pick!)
- Reduce ointment application
- Avoid sun exposure
- No scratching or rubbing
Days 8 to 14:
- Most flaking is complete
- Color appears lighter (this is normal)
- Gradually return to normal activities
- Continue avoiding direct sun
Weeks 3 to 6:
- Pigment continues to settle
- True color emerges
- Skin completely heals
Long-Term:
- Use sunscreen on eyebrows and lips
- Avoid harsh facial treatments on the area
- Schedule touch-ups as recommended
Following aftercare instructions exactly is crucial. Skipping steps or doing prohibited activities can ruin your results.
Technique-Specific Aftercare Tips
Different techniques have specific needs:
Microblading:
- Absolutely no water on brows for first 7 to 10 days
- More intensive aftercare than powder brows
- Careful ointment application to avoid over-moisturizing
- No picking at scabs (can remove pigment)
Powder Brows:
- Can handle more moisture than microblading
- Less intensive aftercare generally
- Still avoid saturating the area with water
Eyeliner:
- Eyes may swell significantly
- Sleep elevated to reduce swelling
- Avoid eye makeup for 2 weeks
- Use ice packs (wrapped, not directly on skin) for swelling
- Expect temporary vision blurriness from swelling
Lip Procedures:
- Expect significant swelling days 1 to 4
- Keep lips moisturized with approved products
- Avoid spicy, hot, or acidic foods
- Drink through a straw
- Sleep elevated
- Apply cold compresses
- Antiviral medication if prone to cold sores
Your artist should provide detailed written aftercare instructions. Follow them exactly for best results.
Common Healing Issues and Solutions
Sometimes healing doesn’t go perfectly. Here’s what might happen and what to do:
Excessive Scabbing: Usually from picking or too much ointment. Don’t pick. Let scabs fall off naturally.
Uneven Color: Normal during healing. Pigment settles over 4 to 6 weeks. If still uneven after healing, touch-up will fix it.
Infection: Rare with proper aftercare. Signs include increasing redness, pain, pus, or fever. Contact your artist and doctor immediately.
Allergic Reaction: Very rare. Redness, itching, or swelling beyond normal healing. Contact your artist and consider medical attention.
Faster Fading Than Expected: Can result from improper aftercare, certain skin types, or medications. Discuss with your artist at touch-up.
Cold Sore Outbreak: Common after lip procedures if you’re prone to them. Use antiviral medication as prescribed.
Most healing issues resolve on their own or with minor intervention. When in doubt, contact your artist. That’s what they’re there for.
Frequently Asked Questions
How painful is permanent makeup?
Pain levels vary by technique and location. Most people describe eyebrows as 2 to 4 out of 10 on the pain scale. Eyeliner is more sensitive, about 4 to 6 out of 10. Lips are the most painful, often 6 to 8 out of 10. However, artists use topical numbing cream that significantly reduces discomfort. Many people find it more uncomfortable than painful, like plucking many hairs at once.
Can I choose any color I want?
Yes and no. Your artist will help you choose colors that work with your skin tone, hair color, and personal preferences. Going too far from your natural coloring can look unnatural. For example, jet black brows on someone with light blonde hair would look obviously fake. Trust your artist’s color recommendations based on their experience.
What if I don't like the results?
This is why choosing a skilled artist is crucial. If you’re unhappy after healing, communicate with your artist. Many issues can be fixed with touch-ups or corrections. In extreme cases, laser removal is possible, though it takes time and money. Prevention through careful artist selection is much better than needing removal later.
How long does each procedure take?
Initial appointments typically take 2 to 3 hours including consultation, numbing, and the actual procedure. Eyebrows usually take about 2 hours total. Eyeliner takes 1.5 to 2 hours. Lips take 2 to 3 hours because of extra numbing time and swelling. Touch-ups are usually faster, about 1 to 1.5 hours.
When will I need a touch-up?
Most permanent makeup requires a touch-up 6 to 8 weeks after the initial procedure. This is often included in the original price. After that, maintenance touch-ups are needed every 1 to 3 years depending on the technique, your skin type, lifestyle, and how well you care for it. Microblading typically needs more frequent touch-ups than machine techniques.
Can I workout after getting permanent makeup?
Avoid intense workouts for at least 7 to 10 days. Sweating can interfere with healing and cause pigment loss. Light walking is fine after a few days, but no gym workouts, running, or hot yoga until you’re fully healed. For eyeliner and lips, wait even longer because those areas are more sensitive.
Making Your Permanent Makeup Decision
Understanding permanent makeup application techniques empowers you to make informed choices about your beauty routine. You’re not just randomly picking a service off a menu. You’re choosing specific techniques that match your skin, lifestyle, and aesthetic goals.
Here’s your action plan:
First, research your options. Now that you understand different techniques, think about which ones align with what you want. Consider your skin type, how much maintenance you’re willing to do, and what look you’re trying to achieve.
Second, find qualified artists. Look for specialists in the technique you want. Check portfolios, read reviews, and verify certifications. Don’t settle for the first person you find or the cheapest option.
Third, schedule consultations. Meet with at least two or three artists. Ask questions, look at their work, and see how they make you feel. The right artist should educate you, not just sell to you.
Fourth, prepare properly. Follow pre-care instructions. Avoid blood thinners, excessive caffeine, and alcohol before your appointment. Come with realistic expectations and reference photos.
Fifth, commit to aftercare. Your results depend heavily on how well you care for your permanent makeup during healing. Follow instructions exactly, even when it’s inconvenient.
Finally, be patient. Permanent makeup looks different immediately after the procedure than it will after healing. Give it the full 4 to 6 weeks before judging results. What looks too dark or too bold initially will soften and settle into beautiful, natural-looking enhancement.
The right permanent makeup application technique in the hands of a skilled artist can genuinely transform your daily routine. Imagine waking up ready to face the day without spending time on your brows, liner, or lips. Imagine confidence knowing your makeup looks good whether you’re swimming, working out, or just rolled out of bed.
That’s the promise of permanent makeup when done right. And now you know exactly what “done right” means. You understand the techniques, the differences between them, and how to find someone who can give you the results you want.
Your features are unique. Your needs are specific. Choose techniques and artists who honor both, and you’ll love your permanent makeup for years to come.
Explore Related Articles on Permanent Makeup & Beauty
Eyebrow Shaping Essentials for Your Perfect Look

Microblading Aftercare Products You Need for Perfect Results
Essential Microblading Aftercare Tips for Lasting Results
Tags

SALE 10%
All NEW clients receive a 10% off discount on their first service!